Microsoft .Net
The visual studio version 6.0 has several drawbacks especially in developing web applications. To overcome these drawbacks of visual studio 6.0, Microsoft started a project with the name Next Generation Windows Services (NGWS) in 1998. But later it was renamed to Visual Studio.Net in the year 2000 and first beta version of .net was released in 2000. .net is available as two products, .net framework and visual studio.net. To create and execute .net applications, .net framework is compulsory but not visual studio.net. Only purpose of VS.Net is to make application development easy and fast by providing GUI. When VS.Net is not available then you can develop .Net applications using notepad. Different versions of .Net framework and its corresponding VS.Net released up to now are as follows.
.Net Framework Visual Studio.Net
1.0 2002
1.1 2003
2.0 2005
3.0 ------
3.5 2008
4.0 2010
4.5 2012
On the operating systems like Windows XP with Service Pack 3, Windows 2003 with Service Pack 1, Windows Vista and Windows 7 operating systems you can install both .net framework 4.0 as well as visual studio.net 2010. Recommended O/S is Windows Vista or Windows 7.
What is .Net?
.net is collection of languages, technologies and servers. It contain languages like C#.net, VB.net, VC++.net and Visual F#.Net provided by Microsoft and several third party languages like C++.Net, Cobol.Net, Pascal.Net and Eiffel.Net. it contain technologies like ASP.Net, ADO.Net, Ajax and Silver Light. It contains servers like SQL Server, Biz talk Server and Share Point Portal Server.
In the name .Net, “.” Refers to object oriented programming and Net refers to Network applications and overall meaning of the name .Net is developing network applications using object oriented programming languages.
What is Platform Independence?
When programs of a language can be executed on any O/S then that language is said to be platform independent. .Net is semi platform independent. Microsoft releases .Net framework only for windows and they released .Net framework specification to open standard by following which a company called Novell develops .Net framework for non windows O/S with the name Mono. But Mono is also available only for few O/Ss like Unix. Linux, Solaris and Mac. Hence .Net is Semi platform independent.
What is CPU platform Independence?
When programs of a language can be executed on any CPU platform then that language is said to be CPU platform independent. .Net CPU platform independent.
What is Language Independence?
In .Net a component created in one .Net language can be directly used in another .Net language without any modification to the code and hence .Net is language independent.
.net framework is an integrated component of operating system that supports development and execution of next generation windows services and XML web services. .net framework architecture is as follows.

Common Language Specification (CLS)
CLS provides a set of rules and an object oriented programming model to be followed by every .net language. When a language follows these set of rules and object oriented programming model then that language is called as CLS Compliant i.e. nothing but .net language. Main purpose of CLS in .Net framework is to integrate multiple languages into .Net
Common Type System (CTS)
Every data type in .net is internally represented either in the form a class or structure. All the classes and structures related to data types in .net are collectively called as CTS. Even every .net language provides its own keywords for data types, internally all the languages use same classes and structures available in CTS. All the structures and classes available in CTS are common for all .net languages and purpose of this in .net framework is to support language independence in .Net
Base Class Libraries (BCL)
In C and C++ header files are available that provides library functions that can be directly used in C or C++ program. Similar to header files in C and C++, in .net framework we have BCL that provide types where a type can be a class or structure or enumeration or interface or delegate that can be directly used in a .net application. A class library is divided in to namespaces and namespaces will contain types. When you want to use a type from class library in your application then you have to add the reference of namespace that contains the type you want to use to your application and for this vb.net provides imports statement and C# provides using statement. This is similar to writing #include statement in C and C++. Total strength of .Net is in Base class libraries and without using at least one type from these base class libraries you cannot develop a .Net application. BCL are made common for all .net languages to support language independence.
Common Language Runtime (CLR)
CLR is the runtime environment in which .net applications are executed. .Net applications are executed in CLR and not in execution environment provided by O/S. CLR is same as execution environment provided by O/S and hence CLR is also called as Virtual Executing System (VES). CLR forms as a layer on top of the operating system and provides its services between operating system and .net. CLR Architecture is as follows.

Class Loader
Class loader is responsible to verify what are the class libraries referred by .net application and load all those class libraries in to memory to make them available for .net application. Class loader is not responsible for loading application code in to memory.
Code Manager
Code manager is responsible for loading .net application code in to memory and manage it until .net application is closed. The .net application code that is loaded in to memory and is running under the control of code manager is called as managed code and the .net application code that is loaded in to memory but is not under the control of code manager is called as unmanaged code. Examples of unmanaged code are the code that communicates with O/S files and folders and network connections.
Garbage Collector
Garbage collector is responsible for automatic memory management for the .net application. Allocating memory for the variable and objects created in .net application and de-allocate memory when their life time is expired is the responsibility of garbage collector.
Security Manager
In .net applications security can be provided either by using Role Based Security (RBS) or Code Access Security (CAS). In whatever the way security is provided, executing security related code is the responsibility of security manager.
Exception Manager
Exception manager is responsible for Exception handling in .net. It is responsible to verify whether there is any possibility for exceptions, raise the exceptions and execute exception handling code if available and otherwise terminate the application abnormally.
Thread Manager
Executing multiple tasks at a time is called as multi tasking. When you want to perform multiple tasking in your applications, then you need to create multiple threads in the application and in this case managing and executing those multiple threads created in the application is the responsibility of thread manager.
Just In Time (JIT) Compiler
Every .net language has its own compiler and it compiles application according to the syntax of that language. But all .net language compilers will produce same code after compilation i.e. Microsoft Intermediate Language (MSIL) code or Common Intermediate Language (CIL) code. Advantage of MSIL code is it is CPU platform independent and also language independent. But MSIL code is not understandable by processor. JIT Compiler is responsible to compile MSIL code to CPU native code understandable by processor. CLR contains multiple JIT compilers, one for each CPU platform.

What is An Assembly?
An assembly is an exe or dll file generated when the dotnet application is compiled. It is also called as PE(Portable Executable) File.
What An Assembly Contains?
An assembly contains the following.
1. Information about other assemblies referred by this assembly, any resource files referred by this assembly and sub modules available in the assembly.
2. Version of the assembly.
3. Metadata i.e. information about types available in the assembly and members available in each type.
4. MSIL code of the assembly.
5. Any Resources like Audio, Video and XML data embedded into the assembly.
What is DLL Hell?
Prior to dotnet, most of the Microsoft technologies are based on COM(Component Object Model) technology. But there are several drawbacks for COM technology that are collectively called as DLL Hell. Drawbacks of COM are as follows.
- Side by side execution of two different versions of same component on the same system is not possible. Because DLL file doesn’t contain version information and while you install a new version, it automatically overwrites the old version.
In case of assemblies, they contain version information and hence while installing a new version; it will not overwrite the existing version and hence two different versions of same component can be run side by side on the same system.
- To use a DLL based component, you must first register in windows registry and it is not possible to use a DLL based component directly from a CD or network resource.
In case of assemblies, no need to register them in windows registry to use them and you can use them directly from a CD or network resource.
- COM based components are platform dependent and they can be used and executed only on windows O/S.
Assemblies are platform independent and can be used and executed on any O/S that supports MONO.
- COM components will be loaded into memory immediately after application is loaded into memory even application is currently not using them.
Assemblies will be loaded into memory as and when they are required and not immediately after application is run, making the memory management efficient.
What is a multimodule assembly?
An assembly with more than one module is called as multi module assembly. By default every assembly created from VS.Net is a single module assembly where it contains only one module. To create multi module assemblies you have to use the command line tools VBC.exe and CSC.exe. Within a multi module assembly there will be one main module that will be taken into consideration by CLR and it is saved with extension either EXE or DLL and other modules available in the assembly are called as sub modules and they are saved with extension .Netmodule. Multi module assemblies have the following advantages.
- A big portion of unused code can be separated in to a module so that it will never be loaded in to memory, making memory management even more efficient.
- When a project is divided in to modules, developer of one module may be interested in VB.net while another developer in C#.net. You can develop different modules of a project in different .Net languages and finally combine them as a single module with the help of multi module assemblies.
Creating Multi Module Assemblies
The following example creates one module in vb.net and one module in c#.net and both are combined to form a single module assembly.
1. Open notepad and type the following code in cs.net syntax and save it with the name Main.cs in D:\.
Namespace Test
{
Class MyClass
{
static void Main()
{
Console.WriteLine(“This is From Main.cs”);
Class1 C1=new Class1();
Console.WriteLine(C.ToString());
}
}
}
2. When you compile the above program using CSC.exe command line tool then it will cause an error at the statement that creates an instance for the class “Class1”. Because there is no class with the name “Class1” within the program.
3. Within notepad write the following code in VB.net syntax and save it with the name VbModule.VB in D:\.
Namespace Test
Class Class1
Public overrides function ToString() as String
Return “This Is From VBModule.VB”
End function
End Class
End Namespace
4. Compile the module created in VB.net i.e. VBModule.VB to VBModule.Netmodule with the help of the command line tool VBC.exe as follows at the command prompt. Command prompt can be opened by selecting Visual Studio 2008 Command Prompt in Visual Studio Tools in Visual Studio 2008 in Programs in Start menu.
VBC /target : module D:\VBModule.VB
5. Copy the VBModule.Netmodule to D:\
6.
|
Compile the Main.cs file by adding VBModule.Netmodule to it with the help of CSC.exe command line tool as follows at command prompt to generate Main.exe file.
CSC /addmodule : D:\CsModule.Netmodule D:\Main.vb
The Main.exe is now a multi module assembly that contains two modules, one created in vb.net and another created in c#.net.
Structure of Modules in An Assembly

PE Header : Contains smallest windows version on which the assembly can be executed.
CLR Header : Contains the version of CLR for which assembly was targeted.
Manifest : This is available only in main module of the assembly and it Contains references to sub modules and resource files available in the assembly.
Metadata : Contains classes, structures, enumerations, interfaces and delegates created in the assembly and it doesn’t contain any code of these members.
MSIL Code : Contains MSIL code for the members of classes, structures, enumerations, interfaces and delegates that are available in assembly.
Resources : Contains any resources that are embedded in to the module and this section is optional.
Observing the Contents of An Assembly
To open and see the contents of an assembly, you can use the command line tool ildasm.exe (Intermediate Language Disassembler). Type the command ildasm at the command prompt that opens ildasm window. In this window in file menu choose open, select the exe or dll file in open file dialog box and click on open button, which will open the assembly in ildasm.
Types of Assemblies
Assemblies are classified in to private assemblies, shared assemblies and satellite assemblies.
Another classification of the assemblies is static and dynamic assemblies. Static assembly is an assembly that was created at design time and dynamic assembly is an assembly that was created at runtime.
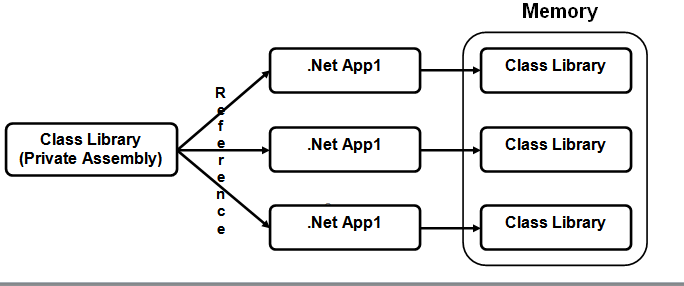
Private Assemblies
An assembly that is private to one particular application is called as private assembly. When a private assembly was referred by three different .net applications and all these applications are run at a time then three different copies the private assembly will be loaded in to memory, one for each application even they are referring to the same assembly. This wastes the memory resources.
Shared
Assemblies
An assembly
that is shared by more than one application is called as shared assembly. When
a shared assembly was referred by three different .net applications and all
these applications are run at a time then only one copy of the assembly is
loaded in to memory and is shared by all three applications. This saves the
memory resources.

By default every assembly created in .net is a private assembly. To convert a private assembly to shared assembly, you have to perform the following steps.
1. Signing the assembly
2. Placing assembly in Global Assembly Cache (GAC)
Signing the Assembly
When an assembly was provided with a strong name then that assembly is called signed assembly. To sign the assembly, follow the following two steps.
1. Create a strong name key file
2. Associate strong name key file to the assembly
Creating Strong Name Key File
To create a strong name key file, use the command line tool Sn.exe that has the following syntax.
Sn –k MyKey.snk
This will create a strong name and writes it to the MyKey.snk file.
Associating Strong Name Key File To Assembly
To associate strong name key file to the assembly, compile the program using CSC command line tool by associating strong name key file generated in previous step and for this use “/keyfile” option within the CSC command line tool.
Csc /target:library /out:<DllFileName> /keyfile:<snkfilename> < filename>
Eg: CSC /target:library /out:Mylibrary.Dll /KeyFile:MyKey.Snk Class1.Cs
Signing the Assembly In VS.net
In .net 2005 you can sign the assembly from within VS.net without using any command line tools and has the following steps.
1. Open the project which you want to convert to shared assembly in VS.net and then open the properties of project.
2. Within the properties of the project select Signing tab and then check the check box Sign the assembly that activates a combo box.
3. Within the combo box select new to create a new strong name key file. This will open a dialog box asking you to enter a name for the strong name key file and password to provide security. Provide a name and password and click on ok button.
4. Close properties window, save the project and build the solution to generate a signed assembly for the project.
After signing the assembly, place it in GAC in order to convert it to shared assembly.
Placing Assembly In GAC
To place an assembly in to GAC, use the command line tool GACUTIL.exe that has the following syntax.
Gacutil /i Pathoftheassembly
GAC is nothing but a folder with the name assembly in windows folder. Once the assembly is placed in GAC, it will become a shared assembly. If you want to remove the assembly from GAC, use the following syntax of Gacutil command line tool.
Gacutil /u Pathoftheassembly
Secret Behind Strong Naming
Strong name is not a name and is a pair of keys called private key and public key. Strong name is used by the CLR to uniquely identify the assembly and provide security for the assembly from tampering by others. The process of making changes to MSIL code of an assembly is called as tampering. When a strong name is associated to the assembly, then a hash algorithm is applied on current content of the assembly to generate a hash value and this hash value is encrypted with the help of private key of strong name to get digital signature and will be stored in manifest of the main module and public key is stored in metadata of the main module.

While executing the assembly, the digital signature available in manifest will be decrypted with the help of public key available in metadata to get original hash value of the assembly and at the same time hash algorithm is applied on the assembly to get hash value based on current content of the assembly. If both of these hash values are matched then assembly was not tampered and will be executed. Otherwise causes error and will not be executed.

Delayed Sigining Of The Assembly
Anyone who knows the hash value and private key of an assembly can tamper the assembly. The developers of the project will know these details of the assembly and hence they have a chance for tampering the assembly. To protect the assembly from this situation, delayed signing was provided. In delayed signing, first assembly will be signed only with public key and just before the assembly was released it will be resigned with both public and private keys only by the trusted person. The process of delayed signing will be as follows
1.Create a strong name key file using sn command line tool as follows.
sn -k <snkfile>
Sn –k MyKey.Snk
2.Extract the public key from .snk file created in first step and store it in another strong name key file using sn command line tool as follows.
sn -p <Snkfile>< publickeysnkfile>
Sn –p MyKey.Snk MyPublicKey.Snk
3.Sign the assembly using the strong name key file that contains only public key.
csc /target:library /out:MyLibrary.Dll /keyfile:<snkfile> /delaysign+ <ProgramFilePath>
CSC /target:library /out:Mylibrary.Dll /KeyFile:MypublicKey.Snk /delaysign+ Class1.Cs
4. When assembly was signed with strong name key file that contains only public key, then hash value will not be encrypted as private key was not available. But space will be reserved for digital signature in the manifest and will be empty. In this case if you try to use the assembly, CLR will try to verify whether assembly was tampered by decrypting the digital signature that was not available and will cause an error. To skip the verification process, write verification skip entries to the assembly with the help of sn command line tool as follows.
Sn –Vr E:\MyLibrary\MyLibrary\Bin\Release\MyLibrary.Dll MyPublickey.Snk
5. Just before releasing the component, resign the assembly with strong name key file that contains both private and public keys with the help of sn command line tool as follows.
Sn –R MyKey.Snk E:\MyLibrary\MyLibrary\Bin\Release\MyLibrary.Dll
6.After resigning the assembly remove the verification skip entries written to the assembly to skip the process of verifying whether assembly was tampered with the help of sn command line tool as follows.
Sn –Vx E:\MyLibrary\MyLibrary\Bin\Release\MyLibrary.DllGDSFG
Debug Tools in C#.NET
For debugging a .net application, debugging tools are provided and are as follows.
Break Point
When you don’t want to execute entire program step by step and you want to execute only a particular method step by step then break points are used. When a break point is placed in the program then during execution when control reaches the break point then program will enter in to debug mode and from there you can execute the program step by step. Shortcut to place or remove a break point is F9.
Watch Window :
This can be used to add a variable to it and observe how the value of that variable changes while executing the program step by step. VS.net provides four watch windows and shortcuts to open watch windows are
CTRL + ALT + W, 1
CTRL + ALT + W, 2
CTRL + ALT + W, 3
CTRL + ALT + W, 4
For adding a variable to the watch window, select the variable, right click on it and then choose add watch. Otherwise select the variable and drag and drop it in watch window. You can also modify the value of a variable in watch window. For this right click on the variable in watch window and choose edit value.
Locals Window :
This is used to observe how the values of local variables of current method are changed as the program is executed step by step. There is no need to add variables to locals window and all local variables of the current method are automatically added to the locals window. Shortcut to open locals window is CTRL + ALT + V, L. Same as watch window in locals window also you can edit the value of a variable.
Immediate Window :
This is used to print the values of variable or expressions and even to change the values of variables. “?” is used to print the value of a variable or expression within the immediate window. To change the value of a variable, write the assignment statement. Shortcut to open immediate window is CTRL + ALT + I. advantage of this is you can execute your own expressions and it is available even at design time. But watch and locals windows are available only at runtime and they can be used only to observe values of variables and we cant write our own expressions.
Creating a new
class from existing class is called as inheritance. When a new class needs same
members as an existing class then instead of creating those members again in
new class, the new class can be created from existing class, which is called as
inheritance. Main advantage of inheritance is reusability of the code. During
inheritance, the class that is inherited is called as base class and the class
that does the inheritance is called as derived class and every non private
member in base class will become the member of derived class. To perform
inheritance, use the following syntax.
[Access Modifier] class ClassName : baseclassname
{
}
Example :
The following example creates a class with the name Base that contains the logic for accepting and printing two integers and another class Derived is created by inheriting the class Base as it requires the logic for accepting and printing three integers.
namespace Inheritance
{
class Base
{
int A, B;
public void GetAB()
{
Console.Write("Enter Value For A : ");
A = int.Parse(Console.ReadLine());
Console.Write("Enter Value For B : ");
B = int.Parse(Console.ReadLine());
}
public void PrintAB()
{
Console.Write("A = {0}\tB = {1}\t", A, B);
}
}
class Derived : Base
{
int C;
public void Get()
{
GetAB();
Console.Write("Enter Value For C : ");
C = int.Parse(Console.ReadLine());
}
public void Print()
{
PrintAB();
Console.WriteLine("C = {0}", C);
}
}
class Program
{
static void Main(string[] args)
{
Derived D = new Derived();
D.Get();
D.Print();
}
}
}
Constructors, Destructor And Inheritance
During inheritance, base class may also contain constructor and destructor. In this case if you create an instance for the derived class then base class constructor will also be invoked and when derived instance is destroyed then base destructor will also be invoked and the order of execution of constructors will be in the same order as their derivation and order of execution of destructors will be in reverse order of their derivation.
Example : The following example creates a class with the name Base1 and another class with the name Derived1 inherited from Base1. Base1 contains default constructor and a destructor and Derived1 also contains a default constructor and a destructor.
namespace Inheritance
{
class Base1
{
public Base1()
{
Console.WriteLine("Base Class Constructor");
}
~Base1()
{
Console.WriteLine("Base Class Destructor");
}
}
class Derived1 : Base1
{
public Derived1()
{
Console.WriteLine("Derived Class Constructor");
}
~Derived1()
{
Console.WriteLine("Derived Class Destructor");
}
}
class ConstructorInheritance
{
static void Main()
{
Derived1 D = new Derived1();
}
}
}
During inheritance, if the base class contains only parameterized constructor, then derived class must contain a parameterized constructor even it doesn’t need one. In this case while creating parameterized constructor in derived class, you must specify the parameters required for derived class along with the parameters required for base class constructor and to pass arguments to base class constructor, use the keyword “base” at the end of parameterized constructor declaration in derived class preceded with “:”.
Example : The following example creates two classes Base2 and Derived2 where Derived2 is inherited from Base2 and Base2 contains a parameterized constructor. Hence derived2 must also contain a parameterized constructor even it doesn’t need one.
Write program to illustrate inheritance in C#.NET?
namespace Inheritance
{
class Base2
{
int A, B;
public Base2(int X, int Y)
{
A = X;
B = Y;
}
public void PrintAB()
{
Console.Write("A = {0}\tB = {1}\t", A, B);
}
}
class Derived2 : Base2
{
int C;
public Derived2(int X, int Y, int Z)
: base(X, Y)
{
C = Z;
}
public void Print()
{
PrintAB();
Console.WriteLine("C = {0}", C);
}
}
class BaseParamConstructor
{
static void Main()
{
Derived2 D = new Derived2(10, 20, 30);
D.Print();
}
}
}
Example : The following example creates two classes Account and Interestaccount where IntersetAccount is inherited from Account class.
namespace Inheritance
{
class Account
{
protected double Balance;
public Account(double Amount)
{
Balance = Amount;
}
public Account()
{
Balance = 0.0;
}
public void Deposit(double Amount)
{
Balance += Amount;
}
public void Withdraw(double Amount)
{
if (Amount <= Balance)
{
Balance -= Amount;
}
else
{
Console.WriteLine("Sufficient Amount Not Available");
}
}
public double GetBalance()
{
return Balance;
}
}
class InterestAccount : Account
{
double Default_InterestRate = 5.5;
double InterestRate;
public InterestAccount(double Amount, Double Interest) :
base(Amount)
{
InterestRate = Interest;
}
public InterestAccount(double Amount)
: base(Amount)
{
InterestRate = Default_InterestRate;
}
public InterestAccount()
{
InterestRate = Default_InterestRate;
}
public void Add_Monthly_Interest()
{
Balance = Balance + (Balance * InterestRate / 100) / 12;
}
}
class BankAccount
{
static void Main()
{
InterestAccount A = new InterestAccount(10000);
A.Deposit(500.00);
Console.WriteLine("Balance After Deposit : {0}", A.GetBalance());
A.Withdraw(1000.00);
Console.WriteLine("Balance After WithDraw : {0}", A.GetBalance());
A.Add_Monthly_Interest();
Console.WriteLine("Balance After Adding Interest : {0}",
A.GetBalance());
}
}
}
Types Of Inheritance in C#.NET:
Single Inheritance :
when a single derived class is created from a single base class then the inheritance is called as single inher

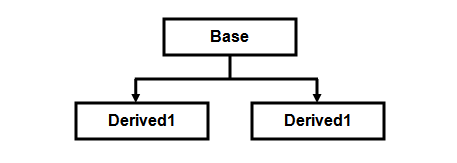
Hierarchical Inheritance :
when more than one derived class are created from a single base class, then that inheritance is called as hierarchical inheritance.
Multi Level
Inheritance :
when a derived class is created from another derived class, then that inheritance is called as multi level inheritance.

Hybrid
Inheritance :
Any combination of single, hierarchical and multi level
inheritances is called as hybrid inheritance.

Multiple Inheritance :
when a derived class is created from more than one base class then that inheritance is called as multiple inheritance. But multiple inheritance is not supported by .net using classes and can be done using interfaces.
Handling the complexity that causes due to multiple inheritance is very complex. Hence it was not supported in dotnet with class and it can be done with interfaces.

Visual C#
Visual C# is one
of the four languages provided by Microsoft in .net. Visual C# version in .net
2002 is 1.0, in .net 2003 is 1.1 and in .net 2005 it is 2.0, in .Net 2008 it is
3.5. The version of Visual C# in new version of .net i.e. .net 2010 is 4.0.
Visual C# has the following important features.
- It is object
oriented programming language. Because it satisfies each and every
feature of object oriented programming like class, object, encapsulation,
abstraction, inheritance and polymorphism.
- It is strongly
typed language. In Visual C# it is not possible to assign one type of
value to another type of variable without manual type casting. Hence it is
strongly typed.
- It is case sensitive. All keywords of the language
must be in lowercase and while referring to built in classes and their
members first letter in every word must be capital.
- Syntax is same as C and C++ that are familiar to most
of the programmers and every statement must be terminated with semicolon
(;).
- To make a line as comment, start the line with // or
///
New
Features In .Net 2005
- Introduces generics
that is similar to templates in C and C++. By using generics you can
create generic methods and generic classes. Generic methods and Generic classes are the methods
and classes that can operate on any type of data.
- Introduces partial
classes. A partial class is
a class whose definition is divided in to more than one file.
- Introduces Nullable
types. A nullable type is a
type that can store null value
along with the valid range of data for its data type.
- Introduces class
diagram that creates a diagram of all classes, members of the class
and relation ship between classes so that it is very easy to understand
the code of the application without going through the entire code of the
application.
- Introduces object
test bench using which you can test a class without writing a program.
- Introduces static
classes. In .net 2005 not only the members of a class but also a class
can be declared as static.
New
Features In .Net 2008
- Introduces LINQ
(Language Integrated Query) using which you can retrieve data from a
collection within the language or database like SQL server or XML by
writing queries similar to SQL.
- Introduces local
type inference. With this feature, you can use a variable without
associating it with a particular data type. This is useful while working
with LINQ.
- Introduces object
initialization using which you can initialize properties of a class
while creating the instance without creating a constructor in the class.
- Introduces anonymous
types using which you can create a class without specifying a name to
it.
- Introduces Extension
methods using which you can add methods to an existing type without
inheriting it.
- Introduces Windows
Presentation Foundation (WPF) that provides efficiency in designing
the windows applications.
- Introduces Windows
Communication Foundation (WCF) that provides a common technology for
both remoting and XML web services.
- Introduces Windows
Work Flow (WF) using which you can provide a series of tasks to
windows operating system that will be executed in a sequence one after the
other.
Data Types
in C#
All the data
types in .net are available within the namespace System and are as follows.
Category
|
Class/Structure Name
|
Data Type in C#.Net
|
Data Type in VB.Net
|
No. Of Bytes
|
Integer
|
Byte
|
Byte
|
Byte
|
1 (Unsigned)
|
Sbyte
|
Sbyte
|
Sbyte
|
1 (Signed)
|
|
Int16
|
Short
|
Short
|
2 (Signed)
|
|
Uint16
|
Ushort
|
Ushort
|
2 (Unsigned)
|
|
Int32
|
Int
|
Integer
|
4 (Signed)
|
|
Uint32
|
Uint
|
Uinteger
|
4 (Unsigned)
|
|
Int64
|
Long
|
Long
|
8 (Signed)
|
|
Uint64
|
Ulong
|
Ulong
|
8 (Unsigned)
|
|
Intptr
|
Intptr
|
Intptr
|
Size varies
|
|
Uintptr
|
Uintptr
|
Uintptr
|
Size varies
|
|
Sbyte, Uint16, Uint32, Uint64, Intptr and
Uintptr are not CLS compliant
|
||||
Float
|
Single
|
Float
|
Single
|
4
|
Double
|
Double
|
Double
|
8
|
|
Decimal
|
Decimal
|
Decimal
|
16 (Can store
any numeric data)
|
|
Character
|
Char
|
Char
|
Char
|
2 (For storing
Unicode characters)
|
String
|
String
|
String
|
Size varies
|
|
Date And Time
|
DateTime
|
Datetime
|
DateTime /
Date
|
8
|
Timespan
|
TimeSpan
|
TimeSpan
|
No pre defined
size
|
|
Logical
|
Boolean
|
Bool
|
Boolean
|
1
|
Other
|
Object
|
Object
|
Object
|
Size varies
and can store any type of value even an object.
|
Console
Applications in C#
A console
application is an application that runs in a console window same as a C and C++
program. It doesn’t have any graphical user interface. To work with console
applications you have to use a class called Console that is available within the namespace System, which is the root namespace in .net. Console class has the following important members.
Member
|
Description
|
Properties
|
|
BackgroundColor
|
Used to change
background color of the console window.
Console.BackgroundColor=ConsoleColor.Blue;
|
ForegroundColor
|
Used to change
the text color of the console window.
Console.ForegroundColor=ConsoleColor.Yellow;
|
CursorLeft
|
Used to set
position of the cursor in console window from left.
|
CursorTop
|
Used to set
position of the cursor in console window from top.
|
Methods
|
|
Clear()
|
Used to clear
the console window.
|
ReadLine()
|
Used to read
the value from keyboard and store it in a variable. The return type of this
method is string. Any value entered through keyboard will be returned by this
method as string. As C# is strongly typed, while reading the value for a
variable other than string you have to perform type casting manual. For this
use Parse method of that particular
type.
Var = Console.ReadLine();
Int N=int.Parse(Console.ReadLine());
|
Write() And WriteLine()
|
Both are used
to print output on console window.
Console.Write(“Message”);
Console.Write(Var);
Console.Write(“Sum of {0} And {1} Is
{2}”,A,B,C);
In both of these
methods you can use escape sequences like /t and /n. difference
between these two is after printing the output, Write() will keep the cursor on same line while WriteLine() places it in new line.
|
Read()
|
Used read a
character but it will not be displayed on screen. This is used similar to
getch() in C language.
|
Structure
of the Console Application
Using statements
Namespace NamesapaceName
{
Class
Program
{
Static
void Main (string[] args)
{
}
}
}
For Part2 Click here
Thanks for visiting this blog. How is the content?. Your comment is great gift to my work. Cheers.
PC Builder Qatar should provide users with ease of movement around the site and a shopping experience with easy-to-use user interface, fast loading speed, and security in payment. To ensure that users return frequently, keeping a comprehensive variety of games, gaming equipment, and accessories available at affordable prices will be a guarantee.
ReplyDelete